
1. Introduction
Real Time Clock (RTC) is a very special peripheral. It is basically a timer with dedicated registers to store calendar and time data such as years, months, days, hours, minutes, and seconds. You can therefore use this peripheral to keep track of time, just like you do with a standard watch.
In addition, the RTC plays a major role in power-saving strategies as it can be the only domain (i.e. power, clock, registers) to stay awake while every other peripheral has been turned into standby or sleeping modes. Note that RTC's own power consumption is very low. You can even turn the STM32 device off VDD and still keep the RTC running as long as you power supply the VBAT pin (using a button battery for instance).
In this tutorial, we will only address a very simple use of the RTC in a time display application.
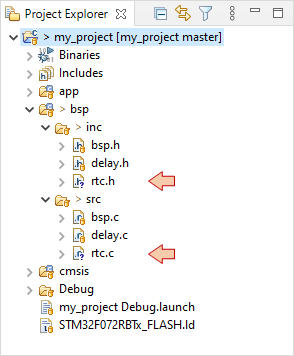
For now, add two source files ![]() rtc.c and
rtc.c and ![]() rtc.h under /bsp/src and /bsp/inc in your project structure:
rtc.h under /bsp/src and /bsp/inc in your project structure:
2. RTC Clock setup
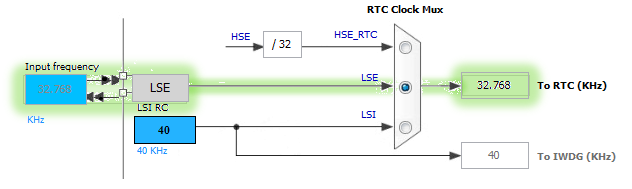
RTC clock source is completely independent from the CPU clock scheme. It has its own oscillator, either internal or external.
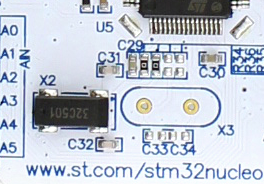
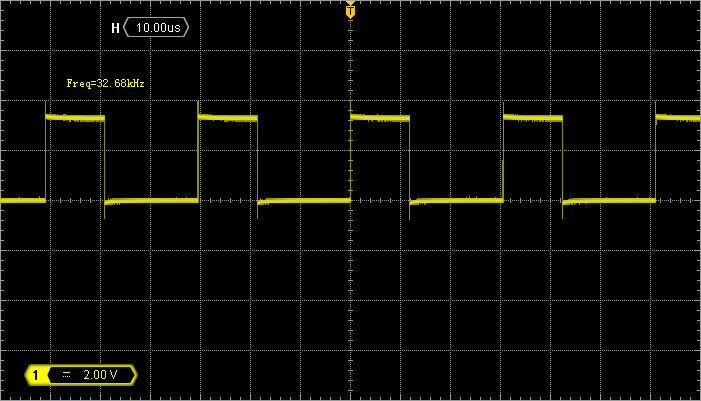
On the Nucleo boards, quartz crystal X2 is mounted to be used as an external, low-speed (LSE) clock source for RTC.
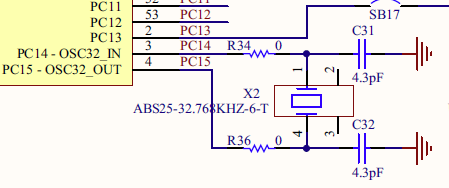
Note that X2 crystal provides a 32.768kHz frequency reference, which corresponds to a period of exactly $\frac{1}{2^{15}}s$
Let us implement the RTC clock setting function. First is the prototype declaration in rtc.h:
/*
 * rtc.h
 *
 *  Created on: 20 août 2017
 *      Author: Laurent
 */

#ifndef BSP_INC_RTC_H_
#define BSP_INC_RTC_H_

#include "stm32f0xx.h"

// Public functions
void BSP_RTC_Clock_Config	(void);

#endif /* BSP_INC_RTC_H_ */
And then, the function implementation in rtc.c:
/*
 * rtc.c
 *
 *  Created on: 20 août 2017
 *      Author: Laurent
 */

#include "rtc.h"

/*
 * RTC_Config()
 * Setup RTC clock and start RTC
 */
void BSP_RTC_Clock_Config()
{
	// Enable the PWR clock
	RCC->APB1ENR |= RCC_APB1ENR_PWREN;

	// Enable access to RTC and Backup registers
	PWR->CR |= PWR_CR_DBP;

	// Resets Backup Domain Config
	RCC->BDCR |= RCC_BDCR_BDRST;
	RCC->BDCR &= ~RCC_BDCR_BDRST;

	// Set driving capability to medium high
	RCC->BDCR &= ~RCC_BDCR_LSEDRV_Msk;
	RCC->BDCR |= (0x02 <<RCC_BDCR_LSEDRV_Pos);

	// Start LSE clock
	RCC->BDCR |= RCC_BDCR_LSEON;

	// Wait until LSE is ready
	while ( (RCC->BDCR & RCC_BDCR_LSERDY) != RCC_BDCR_LSERDY);

	// Select LSE as RTC clock source
	RCC->BDCR &= ~RCC_BDCR_RTCSEL_Msk;
	RCC->BDCR |= RCC_BDCR_RTCSEL_LSE;

	// Enable RTC clock
	RCC->BDCR |= RCC_BDCR_RTCEN;
}
The main purpose of the above function is to start LSE oscillator and to use it as RTC clock.
Note that the driving capability setting can produce unexpected results. Driving too high or too low may prevent the oscillator from working.
For this reason, you may want to have a look on the LSE clock by editing the SystemClock_Config() function so that PA8 pin outputs LSE clock instead of the System Clock as we did before:
static void SystemClock_Config()
{
	...

	/*--- Use PA8 as LSE output ---*/

	// Set MCO source as LSE
	RCC->CFGR &= ~RCC_CFGR_MCO_Msk;
	RCC->CFGR |=  RCC_CFGR_MCOSEL_LSE;     // Change here

	// No prescaler
	RCC->CFGR &= ~RCC_CFGR_MCOPRE_Msk;

	// Enable GPIOA clock
	RCC->AHBENR |= RCC_AHBENR_GPIOAEN;

	// Configure PA8 as Alternate function
	GPIOA->MODER &= ~GPIO_MODER_MODER8_Msk;
	GPIOA->MODER |= (0x02 <<GPIO_MODER_MODER8_Pos);

	// Set to AF0 (MCO output)
	GPIOA->AFR[1] &= ~(0x0000000F);
	GPIOA->AFR[1] |=  (0x00000000);

	...
}
Then trying something very simple:
...
#include "rtc.h"
...

// Main program
int main()
{
	// Configure System Clock
	SystemClock_Config();

	// Initialize RTC clock
	BSP_RTC_Clock_Config();

	// Main loop
	while(1)
	{
		// Do nothing
	}
}
Probing PA8 now exhibits the LSE clock. You should get a stable clock at 32.768kHz:
3. Using the RTC
3.1. Set & Display current time
We need to implement a few functions to make RTC use easier:
- A function that sets RTC time → BSP_RTC_SetTime(…)
- A function that reads RTC time → BSP_RTC_GetTime(…)
Because “time” is actually made of hours, minutes, seconds, let us define the dedicated data structure type time_t.
Add the definitions to your rtc.h header:
/*
 * rtc.h
 *
 *  Created on: 20 août 2017
 *      Author: Laurent
 */

#ifndef BSP_INC_RTC_H_
#define BSP_INC_RTC_H_

#include "stm32f0xx.h"

// Typedefs
typedef struct
{
	uint8_t hours;
	uint8_t minutes;
	uint8_t seconds;
} time_t;

// Public functions
void BSP_RTC_Clock_Config   (void);
void BSP_RTC_SetTime        (time_t *ptime);
void BSP_RTC_GetTime        (time_t *ptime);

#endif /* BSP_INC_RTC_H_ */
Then add the following implementations into rtc.c. The first one is for the BSP_RTC_SetTime(…) function:
/*
 * BSP_RTC_SetTime(uint32_t time)
 * - Sets RTC Prescalers
 * - Sets RTC time
 */

void BSP_RTC_SetTime(time_t *ptime)
{
	uint32_t	bcdtime;

	bcdtime = 	( (byte2bcd(ptime->hours))   <<16U) |
			( (byte2bcd(ptime->minutes)) <<8U)  |
			( (byte2bcd(ptime->seconds)) <<0U);

	// Enable Write access for RTC registers
	RTC->WPR = 0xCA;
	RTC->WPR = 0x53;

	// Enter Init
	RTC->ISR |= RTC_ISR_INIT;
	while ((RTC->ISR & RTC_ISR_INITF) != RTC_ISR_INITF);

	// Setup prescalers for 1s RTC clock
	RTC->PRER = 0x007F00FF;

	// Set time
	RTC->TR = bcdtime;

	// Exit Init
	RTC->ISR &= ~RTC_ISR_INIT;

	// Disable Write access for RTC registers
	RTC->WPR = 0xFE;
	RTC->WPR = 0x64;
}
Note that prescalers are set to:

in order to get a 1s clock for the RTC counter.
Next, comes the BSP_RTC_GetTime(…) function:
/*
 * BSP_RTC_GetTime()
 * Retreive current RTC time in binary format
*/

void BSP_RTC_GetTime(time_t *ptime)
{
   ptime->hours   = bcd2byte((RTC->TR & (RTC_TR_HT_Msk  | RTC_TR_HU_Msk )) >>RTC_TR_HU_Pos);
   ptime->minutes = bcd2byte((RTC->TR & (RTC_TR_MNT_Msk | RTC_TR_MNU_Msk)) >>RTC_TR_MNU_Pos);
   ptime->seconds = bcd2byte((RTC->TR & (RTC_TR_ST_Msk  | RTC_TR_SU_Msk )) >>RTC_TR_SU_Pos);
}
Because time and date data in RTC register is stored in a BCD (Binary Coded Decimal) format, let us write both ways conversion functions (byte2bcd(), bcd2byte()). These functions are 'hidden' from the main application by using the static attribute. Only functions within rtc.c can call them. For this reason, function prototypes are not published in the header rtc.h.
At the beginning of rtc.c, add the prototypes declaration:
// Static functions
static uint8_t byte2bcd	(uint8_t byte);
static uint8_t bcd2byte	(uint8_t bcd);
And wherever you want (e.g. at the end) in rtc.c the two conversion functions:
/*
 * Converts 2 digit Decimal to BCD format
 * param: 	Byte to be converted.
 * retval: BCD Converted byte
 */

static uint8_t byte2bcd(uint8_t byte)
{
  uint8_t bcdhigh = 0;

  while (byte >= 10)
  {
    bcdhigh++;
    byte -= 10;
  }

  return  ((uint8_t)(bcdhigh << 4) | byte);
}

/*
 * Convert from 2 digit BCD to Binary
 * param  BCD value to be converted.
 * retval Converted word
 */

static uint8_t bcd2byte(uint8_t bcd)
{
  uint8_t tmp = 0;

  tmp = ((uint8_t)(bcd & (uint8_t)0xF0) >> (uint8_t)0x4) * 10;

  return (tmp + (bcd & (uint8_t)0x0F));
}
Now, we’re ready to experiment RTC within the main() function:
...
#include "rtc.h"
...

// Main program
int main()
{
	time_t		now;

	// Configure System Clock
	SystemClock_Config();

	// Configure RTC Clock
	BSP_RTC_Clock_Config();

	// Set RTC time
	now.hours   = 12;
	now.minutes = 00;
	now.seconds = 00;
	BSP_RTC_SetTime(&now);

	// Console init
	BSP_Console_Init();
	my_printf("\r\nConsole Ready!\r\n");

	// LED init
	BSP_LED_Init();

	// Main loop
	while(1)
	{
	   BSP_RTC_GetTime(&now);

           my_printf("RTC Time is %02d:%02d:%02d\r", now.hours, now.minutes, now.seconds);

	   BSP_LED_Toggle();
	   BSP_DELAY_ms(100);
	}
}
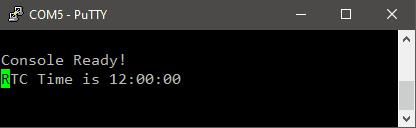
The above code simply initializes RTC time registers to 12:00:00. Then, the infinite loop displays the current time from there, at regular 100ms intervals.
Build the project, flash the target and open a terminal window (Putty).
You should see a clock displaying the current time, starting from 12:00:00:
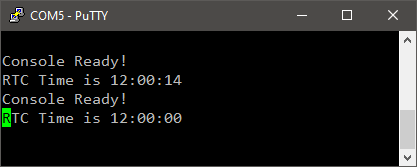
Wait some time, and then press the Reset (black) button on the Nucleo board. You can see that your clock is starting over at 12:00:00 every time you press the Reset button.
 |
 Commit name "RTC basics" Commit name "RTC basics" Push onto Gitlab Push onto Gitlab |
That would be nice if the clock could keep track of current time regardless reset events…
Let us do that!
3.2. Prevent RTC reset in case of hardware reset
To avoid setting RTC time in the initialization part of the main() function, we first need to know by which mechanism the code starts executing. It can be for instance:
- A Power On event (i.e. the device has just been powered on)
- A Reset event
- A Watchdog event
- …
Note that a Power On event will most likely also produce a Reset event. This is because a capacitor is always connected to the reset pin (NRST) to make sure that reset signal goes high a small amount of time after power is stable in the device.
The RCC peripheral features register flags that are updated depending on the way the code execution starts.
Edit the main() function as follows:
// Main program
int main()
{
time_t now;
// Configure System Clock
SystemClock_Config();
// Peripheral Inits
BSP_LED_Init();
BSP_Console_Init();
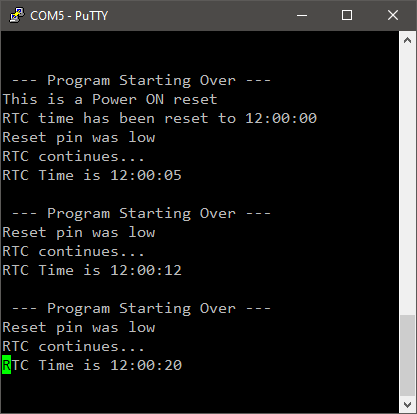
my_printf("\r\n\n --- Program Starting Over ---\r\n");
// If this is a Power ON reset
if ( (RCC->CSR & RCC_CSR_PORRSTF_Msk) == RCC_CSR_PORRSTF )
{
my_printf("This is a Power ON reset\r\n");
// Setup RTC clock
BSP_RTC_Clock_Config();
// Setup RTC time to 12:00:00
now.hours = 12;
now.minutes = 00;
now.seconds = 00;
BSP_RTC_SetTime(&now);
my_printf("RTC time has been reset to 12:00:00\r\n");
}
// If reset pin was held low
if ( (RCC->CSR & RCC_CSR_PINRSTF_Msk) == RCC_CSR_PINRSTF )
{
my_printf("Reset pin was low\r\n");
my_printf("RTC continues...\r\n");
}
// Clear reset flags for next reset
RCC->CSR |= RCC_CSR_RMVF;
// Main loop
while(1)
{
BSP_RTC_GetTime(&now);
my_printf("RTC Time is %02d:%02d:%02d\r", now.hours, now.minutes, now.seconds);
BSP_LED_Toggle();
BSP_DELAY_ms(100);
}
}
By pressing the Reset button, you trig a Reset Pin event, without powering off the device. Therefore, no Power-On is found at startup.
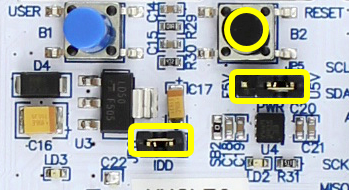
In order to generate a Power-On startup event, you can for instance take the JP6 (IDD) jumper off for a moment and then back. You can do the same with JP5.
Test the program using both Reset button and Power ON (using IDD jumper). You should be able to detect the startup condition, and then keep track of time when reset comes from the Reset button. For the reason above explained, the powering on the device also produces a Reset Pin event.
|
Commit name "RTC dealing with reset" Push onto Gitlab |
3.3 Using RTC backup registers
The RTC peripheral provides five 32-bit registers, you can use as you want to save/read data that must survive a complete shutdown the MCU power supply (assuming VBAT is still powered).
Add for instance this code:
// Main program
int main()
{
	time_t		now;
	uint32_t	count;
...

	my_printf("\r\n\n --- Program Starting Over ---\r\n");

	// If this is a Power ON reset
	if ( (RCC->CSR & RCC_CSR_PORRSTF_Msk) == RCC_CSR_PORRSTF )
	{
		...
	}

	// If reset pin was held low
	if ( (RCC->CSR & RCC_CSR_PINRSTF_Msk) == RCC_CSR_PINRSTF )
	{
		...
	}

	// Use Backup registers to count reset events
	RCC->APB1ENR |= RCC_APB1ENR_PWREN;
	PWR->CR |= PWR_CR_DBP;

	count = RTC->BKP0R;
	my_printf("Reset #%d\r\n", count);
	count++;
	RTC->BKP0R = count;

	// Clear reset flags for next reset
	RCC->CSR |= RCC_CSR_RMVF;

	// Main loop
	while(1)
	{
		...
	}
}
Now you can count the number of times you pressed the Reset button:
|
Commit name "RTC backup registers" Push onto Gitlab |
4. Summary
In this tutorial, you have learned the very basic use of the RTC peripheral. In addition, you have learned how to select correct initialization steps depending on the startup condition.
Add new comment